
As we prepare for our new normal and do our best to embrace the changes of the past two months, CPiF has started a new blog series to help our community navigate this uncharted territory and face the challenges ahead.
Since many of us will be looking to selling online for the immediate future, we have reached out to a few professionals across various sectors to gather some key tips and practices to help you make your online shop as successful as possible.
Last week we talked about how to price your work for profit. This week we reached out to two of our good friends and professional photographers, Dorin Vasilescu and Olga Makarova, who have both generously shared in-depth guides for taking high quality photos of your products for your online shop.
Since we want to make sure to cover all the bases, we’ve broken this topic into two separate posts. In this post Dorin will show us how to take advantage of our smartphone camera to get clear and well-lit photos of our products. In the next post, Olga will focus on using a DSLR camera for still life/product photography. We are so grateful that they were able to find the time to share their expertise and insider tips.

INTRODUCTION
When it comes to online retail stores (eCommerce), high-quality product photography is the key to improving your sales. Since eCommerce consumers are unable to physically interact with the product, the perceived value of your products and the trustworthiness of your brand are often judged by the quality of your visual content. That means, after you put all your work and talent into creating your piece of art, a large part of how successful your product will be depends on how it is presented in your photos—is it attractive enough to grab the consumers’ attention and urge them to buy?
Although hiring a professional will increase the quality of your images (and allow you more time to focus your attention on other aspects of your practice), you may not have the resources to do this right now.
So, how can you stand out from the crowd and help your customers visually connect with your product?
Here are some basic tips and tricks to improve your product photography, with almost no gear at all.
USING YOUR SMARTPHONE CAMERA
If you don’t have a camera (or a budget for a new one), don’t worry, most smartphones in today’s market come equipped with great cameras. With a keen eye and an open mind you can work miracles. Smartphones also provide you with an all-in-one photography solution. Using your phone, you can take photos, edit them, and even directly publish them on your website.
RULES TO REMEMBER:
Don’t shoot in auto mode – if your default camera app is not allowing you to control the camera in manual mode, try to download an app with such an option. These apps have been designed to help you use your camera’s smartphone to its full potential and give you control over the final image (Look for Camera ZOOM FX (Android); iPhone Camera+ (IOS), VSCO, etc. ).
Don’t use the digital zoom (or zoom as little as possible) – the smartphone camera’s image quality gets worse the more you zoom in. Try moving your phone closer to the product instead.
Don’t use the built-in flash – the flash on your phone will not give you the results you need. If you need more light, get it from other light sources. Add a reflector/bounce card, increase the power on artificial lights, move closer to the window, etc. I will discuss these options below.
Don’t use photo filters – keep the image as natural as possible so the photos are an accurate representation of the product.
Clean your camera lens for any possible particles of dust or dirt.
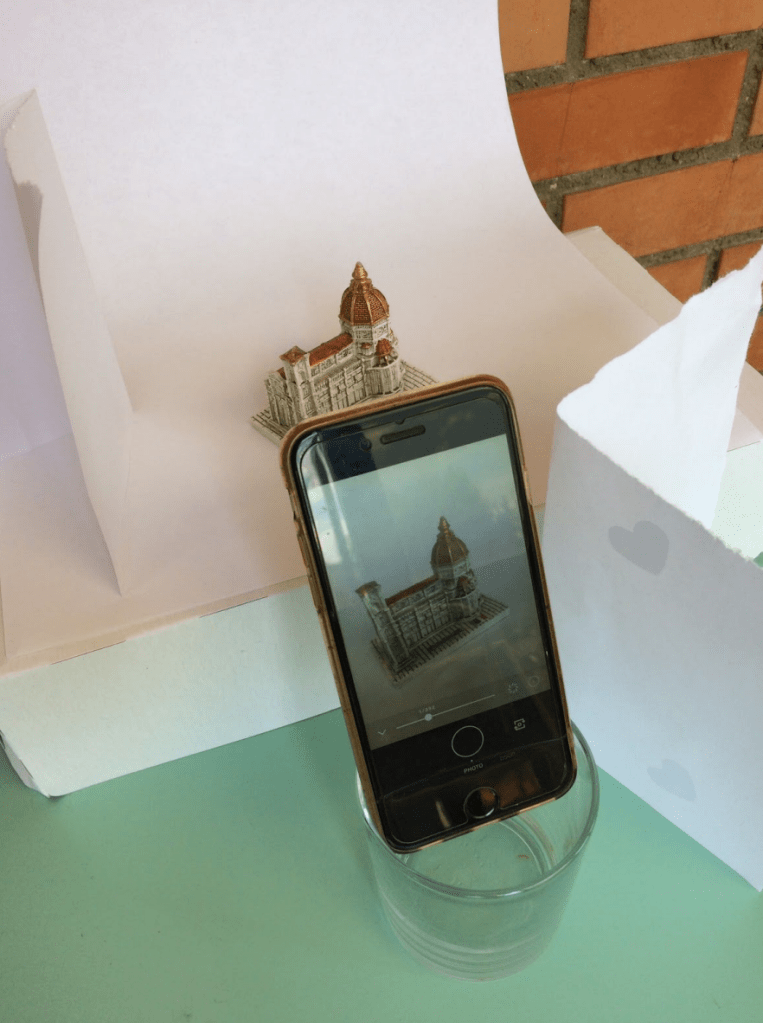
Use a tripod or, if you don’t have one, use a sandbag, a clamp, or improvise something to keep your phone steady (see the pictures below), and maintain consistency between your images.

CAMERA SETTINGS CHEAT SHEET: These settings can be controlled by using the apps mentioned above
Quality: It is very important that you set your image quality to High so that your smartphone can help you create the best images possible.
ISO: One of the most important settings that you have to control is the ISO. This value changes your camera’s sensitivity to light: the higher you go, the more light your phone captures, but a high ISO will create more image noise. Try to keep the ISO value as low as you can. Use ISO 100.
White Balance (WB): in a few words it means adjusting colors so that the image looks more natural. Keep it on AUTO, but if necessary, depending on the light temperature conditions, change between different modes until your product colors look as close to the original.
Exposure: set cameras shutter speed to 1/125 sec or higher to ensure clear and crisp shots.
Aperture – keep it between f/5.6-f/8 – for product photography you want a big depth of field, so your entire product is in sharp focus.
LIGHTING
The appearance of the color in your images is almost entirely based on your lighting technique.
For most situations in product photography, you will want to avoid harsh light or deep shadows.
- Place your table so that the light from the window is not hitting your setup directly
- Use curtains to soften the light coming through the windows. This will help you create that classic studio look that most product images have.
- Use bounce cards (sheets of white paper) around your product to fill in shadows and create well balanced lighting on your background or product. They will reflect the light from your main light source (the window).
If you are shooting at night or in a room where natural light is limited, you can use artificial light. Although it might seem difficult to control the artificial light, try to apply the same principles as for the natural window light. You can use some small lamps around your setup (do not point the light directly on your product!), or with a very small investment you can buy a light tent (light box) from Amazon. Most of them come with lights included. Their advantage is that the tent will diffuse and spread the light evenly on your setup, giving you the exact result you are looking for.
BACKGROUND
Most online retail stores use a white background to display their products. You can go for that or, if want to use other colors, it’s recommended that you use a single color backdrop so you can have a clean and consistent look and eliminate any distraction from your product. You want the focus to remain on the product!
- To capture a perfect one color background with no corners or blemishes, use a “sweep” – a sheet of paper whose bottom acts as the surface beneath your product and then curves up into a wall behind the product; on camera, the sweep’s curve is invisible
- If your main light source comes from one side, use a bounce card to compensate the light on the other side of the backdrop so your light is evenly distributed.

For your promotional images, social media posts, etc., you may want to use a more creative background/scenery. In that case, it is totally up to you how you light your backdrop. Keep your mind open and be creative!
PRODUCT
Before you start shooting, make sure you have cleaned your product.
Capture 2-3 images of the product from different angles, 1-2 detailed images from up-close, and thereafter, you can use a creative image you captured using props or a model.
You have to think about how your customers look, hold, use, and even try your merchandise in a store to ensure that they will have the same experience when looking at the images of your product.
As a simple rule, the main image of the product has to be captured from a certain angle. Most of the time, we are first looking at an object we have in front of us from a 45 degree angle (or close to it)
EDITING
All digital images need a little bit of tweaking to really shine. There are tons of powerful phone apps you can use to edit your images, from your default camera editing app to Adobe Lightroom and Snapseed (for more in-depth editing). These apps and programs have easy-to-use features that just about anyone can figure out.
The basic adjustments that you should consider to enhance your images are:
Crop & Straighten, Sharpen, Contrast, Shadows, Vibrance.
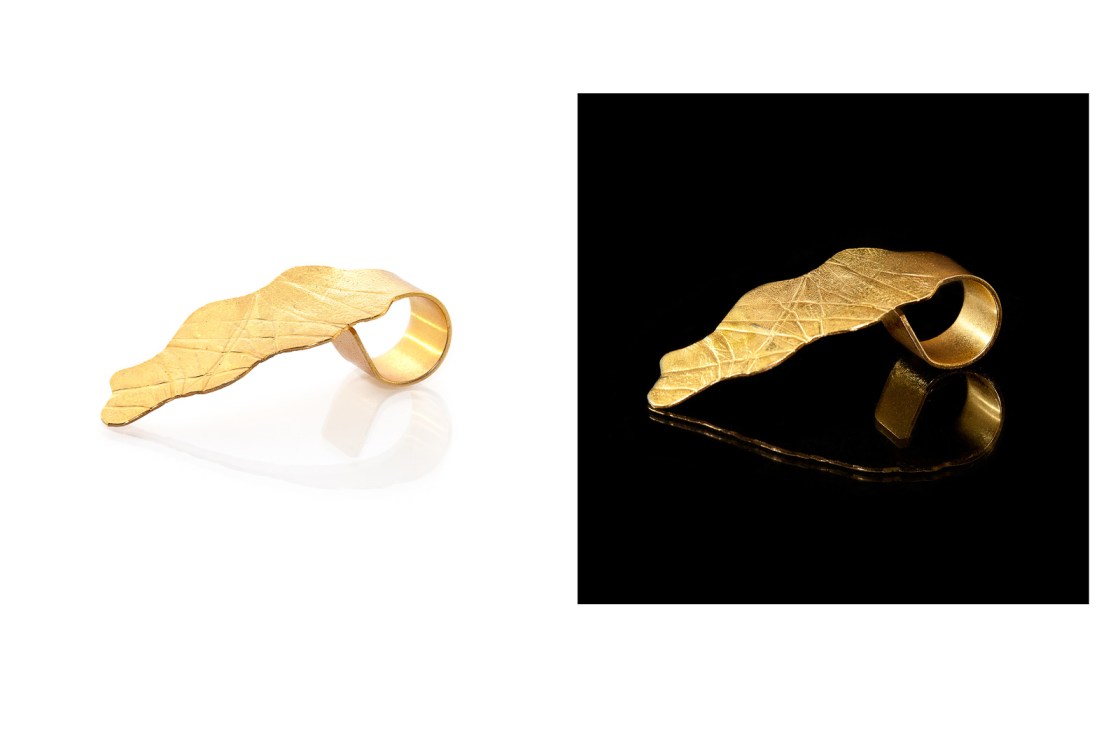
Very challenging products (for example ones that are reflective, or white products on white backgrounds) will probably need some additional editing (such as background removal or other types of retouching). Although some of these editing techniques can be easily applied by anyone, you may also consider working with a photo retoucher if you are not getting the results you want.
When you are editing your images, remember to not overdo it. The goal is to make the product stand out and look as good as possible, but the image should still be an accurate representation of what the product looks like in reality. For this type of image, “artistic” approaches should all be avoided (filters, borders, flares, etc.)
NOW ITS UP TO YOU!
Now it’s time to get started and take your DIY product photography to the next level!
Don’t be discouraged if your results aren’t perfect straight away – product photography is a skill that takes practice and patience. The tips and tricks outlined here cannot and will not replace a professional photographer. Wishing you happy shooting and good light!
Ps: Have some duct tape and fishing wire close by when you are shooting… you will thank me later 😉

Dorin Vasilescu is a commercial and editorial portrait photographer working on assignments for national and international magazines & publications, advertising agencies and designers. His photo studio, located in Florence, produces visual content for international brands and corporate clients. He is co-founder of ForgetMeNot Media, a full-service photo, audio & video media production company with offices in Florence and Berlin.
During the national lockdown in Italy, he documented the empty streets of Florence, showing a glimpse into the solitude, as well as the raw beauty of the city. The prints can be ordered at prints.timmistudio.com . Add CPIF10 at the checkout and you will receive another 10% off until May 18th.

3 Comments